Monday, March 19, 2012

The Light Fantastic - Long Exposures & Light Painting in N-Photo Issue #


Cover of the current issue
Last week saw the publication of N-Photo issue #5 featuring a behind the scenes look at an intensive night shoot covering five individual styles in one extended session. Here's the story of the story and how it all came together - you've never been so far behind the scenes!

The shoot had been in the planning since the week the magazine was first announced back in September or October. N-Photo is a brand-specific publication, following on from the success of its sister title for Canon users. Naturally, as a Nikon devotee I wanted to be a part of it so I got in touch. After considering my portfolio, I heard back from the editorial team offering me the chance to induct an apprentice into the dark art of night photography. I love to share my knowledge and experience so it seemed a great way of getting involved.

With a tip of the cap towards nostalgia we arranged to meet on the day of the shoot in the Krispy Kreme donut store. It's where so many great evenings with the Portsmouth at Night flickr group started from so seemed fitting to commence our own shoot there too. 

Eddie (the apprentice) seemed enthusiastic to learn and had a healthy level of general photographic experience, not to mention a shiny D7000 for us to spend the night shooting with. Chris (the editor) frantically scribbled notes about Eddie's and my backgrounds; and Andy (the mag photographer) and I spent a few minutes geeking out about gear, why we preferred being behind the camera, and the rise of the weekend warrior. With the formalities done and dusted we headed off to the first of the night's locations to shoot some traffic trails.

Even caught the oncoming blue lights of a police car
 in one of our early shots (© Eddie Bull)
Arriving pre-rush hour gave us chance to set up with time to spare and a bit of light to see what we were doing. I don't know exactly what gave it away but it was during this first set of shots it dawned just how long a night we were in for. Our Apprentice shots were taking up to 30sec per frame, and for each composition we needed several frames to choose the strongest aesthetically. We needed a choice of compositions, and to top it off Andy, the mag's own photographer, was diligently recording every step of the way which required lots of unnatural pauses and enforced smiles :) A full three hours after meeting, we'd travelled less than 5 miles and bagged one shot. Let's move on, shall we?

The next stop was to lightpaint the car- a Galaxy people carrier kindly loaned to us by Ford. The concept had been to combine the car shot with some star trails (Galaxy, geddit?) and I'd provided Chris (the editor) with an itinerary to help keep us on track. What I hadn't been able to account for was the weather and sadly this night was anything but clear. Scrapping the startrails meant an impromptu location change and whilst I'm a big advocate of fresh locations, this wasn't the time to be discovering the unexpected. Instead we headed to a site I've used once before: just two miles away from the motorway bridge on which we'd started stands an impressive vista over Portsmouth. When it's clear, you can make out so much of the island and beyond but it wasn't to be… with light-polluted cloud hanging over us and occasional spots of rain keeping us alert to the conditions, we livened up with a cup of tea from the Thermos before stepping out into the hilltop gusts. 

I have an arsenal of lightpainting gear, ranging from my home-made 3500 lumen ShadowKiller down to the light on the back of my mobile phone - used for high-ISO work. For the mag, though, we chose to use something accessible by most of the readers that didn't require too much faffing around with settings. 

Over the next couple of hours we lit the car, posed for the camera, and did it all to coincide with gaps in the traffic - sometimes to dodge oncoming cars, other times to capture outgoing taillights. It's one such moment that's used as a double-page spread to open the feature on page 10 of the mag.

Four lighting frames and a colour shift -
all done in camera (© Eddie Bull)
Using the amazing Image Overlay feature on the Nikon we layered images right there in the camera to assure ourselves that we had all the necessary frames to produce a really striking shot with as little post production as possible. I've never before had reason to post details of my PP before but in addition to a step-through for using Image Overlay, the magazine has a screengrab of the layers palette to show the work that was done in PhotoShop.


Andy's portrait orientation lends itself to
this full-page preview format.
With the car shot in the bag, despite the morphing of evening into full nighttime we took a few moments to recharge with some fast food and caffeine infusions. Burgers downed, shot three beckoned so I installed the tripod behind the Galaxy's front seats and Andy folded himself into the boot. Eddie and I were up front, featuring in Andy's photos, whilst the main focus of the shot from Eddie's camera was the view through the 'screen and glass roof. One of Andy's shots from the boot was used in Issue 4 to promote this forthcoming feature.

Out of sight of both cameras was an SB-800 speedlight that was being triggered by CLS - Creative Lighting System, another awesome Nikon feature that gives you full control of your speedlight setup from the camera's menu - using this system is also covered in the feature. Andy synced his settings to those on the D7000 and we drove through the city - can't be sure but I think Chris might have had a sneaky power nap back in the car park while this was going on. Each time Andy opened his shutter, Eddie waited a second then fired the D7000 which triggered the speedlight - that way both images were able to take advantage of a single flash burst. The main qualities I looked for in the driving shot were symmetrical composition and balanced, well-exposed light trails. Mostly it's down to timing the opening of your shutter so in just a few minutes we were ready to move on to shot number four. Interestingly, Chris exercised his editorial discretion to publish one of the more frenetic shots we captured.

At nearly midnight we headed out of town, in search of the kind of murky darkness you only get in rural areas. I dragged a whole bunch of lightpainting tools out of the car - to be fair, that's probably the hardest I worked all night - and with rain threatening, we set up in the relative shelter of a disused railway underpass. Andy continued to record each step, working in unparalleled darkness and having to take into account not only the lightpainting but the need to show Eddie's camera. It was a tough gig for sure.

Talking of test shots here's a frame to check the
flash exposure before setting off for the driving shot.
I'm an advocate of test shots but as soon as the cameras were set up I went for it in earnest. Running order was dictated by ease of positioning the tools: Green 'alien eyes' first; then the dome; finishing with wire wool at the back. Little chunks of rock were used as markers on the ground for where the tools needed to go, whilst a dim glowstick on the tripod helped determine the right angle towards the camera. This attempt was just shy of 5 mins in a single exposure but it wasn't good enough - the rough surface of the underpass meant the dome was imperfect. Of all people to roll an imperfect dome, there was no way I could let it pass. The second attempt was passable and we made a third, broken-down run for the sake of the documentary. I wrote a tutorial previously on the blog for creating light-painted domes.

With the end in sight we moved less than 50 metres but could've been worlds away. The Victorian brick surrounds of the railway were literally behind us, replaced through the viewfinder with extensive woodland - the perfect setting for a freaky silhouette. 

Now, when I work solo I only use my torch for photographic purposes, once everything's set up. Maybe I eat more carrots than most but I find it more hindrance than helpful to have to keep adjusting to torchlight flashing on and off. I want to see like my camera will, picking up every pixel of ambient light and its tone. Without telling tales, let's just say that in the company of others and their torches, it took longer than usual to compose the final shot... 

There's not a lot more to say about the last few minutes of the N-Photo encounter. The shot was again nailed on the second take, 100 seconds of flapping around with EL wire whilst the background light pollution slowly burnt into the scene. The key to the crisp silhouette was not so much that the subject was asleep (although he may well have been by this time) nor the threat of punitive measures if we had to shoot it again; instead, I worked from head to toe doing my best to communicate each stage of the process so he knew when it was ok to relax.
It was nigh-on 3am when we headed our separate ways. Within minutes the clouds finally succumbed to their own weight and unleashed torrents of rain but we'd achieved what we set out to do. 


The published feature will appeal to all photographers with an interest in low light techniques and light painting, but with the magazine's brand loyalty some of the killer tips are those aimed at Nikon users- namely custom settings, Image Overlay and using CLS to control speedlights. 


I'm particularly impressed with how well the images printed - away from the luminance of a computer screen it's really easy for night images to look badly underexposed but the N-Photo team have clearly worked hard to reproduce the pictures honestly. 


To Eddie, Chris and Andy, it was a genuine pleasure working with you all!

Next up on the blog - I'll be posting shortly an updated version of my driving shots tutorial.

Tuesday, November 8, 2011

Story of... Out After Midnight

Posted as an insight to this image on flickr of a long exposure star trail over a small island.

The changes were tiny at first, and I barely noticed them.

But soon the patches of darkness caused by increasing distances between streetlights meant there were places for people to hide. I stopped beneath a lamp to question whether I was doing the right thing, out after midnight in a town I don't know in a country whose language I don't speak.

On the one hand I was tired, having walked many km over the last 24 hrs looking for potential locations; my legs were starting to whisper that they didn't have much left in them.

On the other hand, I hadn't seen a soul since I left the hotel so what were the chances of needing to flee from an aggressive stranger?

Turning Point: where the houses started to change (© Google)
I looked to where I'd come from. And turned back to face where I'd been heading. Behind me, small houses, low apartment blocks, taller towers of flats and the distant glow of the city. Ahead of me small houses, bigger houses, bigger houses with more land. The cars got newer and shinier.

It wasn't until I saw a small dinghy in someone's front garden that I knew my hunch was going to pay off. Looking out over water from this near-island city would mean looking towards nothing but clear dark skies. Shuffling my camera over my shoulder felt reassuring, serving as a reminder how I'd found myself in this moment.

I walked on.

Just a few hundred metres further I found the lake and spent a few minutes watching the settled mist on the water. One of the most common disruptions to night photography is a lens that won't stop misting over. Would it happen to me? Hopefully the time spent with gear over my shoulder had allowed it to adjust to the ambient temperature.

Nearly... couldn't make a landscape version work
To the right of the island, Orion had just risen above the waterlogged horizon. With its 7 bright stars, Orion would have left a landscape frame too imbalanced so I set up vertically, taking extra time in the extreme darkness to align the horizon precisely.

When I'm out on location, one of the ways I double-check my alignments is to fire off a test shot then zoom in to a horizontal or vertical line within the frame to see if it runs parallel to the margins of the camera's preview screen. Unable to make out any usable reference points, it took several attempts on this occasion.

Having gone to the expense of hiring a fast, wide lens, I wanted to shoot at f/1.4 so that was the first setting to get dialled in. My ISO started at 200 which is the native setting on the D300- the point at which its most comfortable; the point with the most dynamic range.

Next up, 30sec on the exposure duration. It's the longest most cameras will expose for without manual intervention which makes it ideal for star trails where you want to fire off dozens of frames continuously with the cable release locked down.

I shot a frame at those settings and reviewed: the stars were coming through just fine but the scene was darker than I liked. I added light with exposure adjustments and a minor ISO shift then set the shutter running.

Couple of little tips for you: an intervalometer would have made things so much easier than standing next to the camera throughout the exposure, clicking the shutter cable closed then open again at a precise frequency. Without the intervalometer I ran the risk of missing an interval, or knocking the tripod, or some other element of human error. As it was, the timer on my phone alerted me to each passing minute and, fortunately, things turned out good.

Secondly, standing in the dark my camera becomes the brightest object around when I preview my shots. The LCD brightness is turned down to compensate but I always add up to 2/3rds stop of light to what looks like the right settings, just to be sure.

Starting to feel the cold of the Finnish autumn and aching from shutter RSI, it was time to pack up, but not yet time to let my guard down. With the reverse walk ahead of me I pocketed the memory card, a habit to safeguard my work, and headed back to the hotel.

Route: Thankfully I travelled light for the walk (© Google)


At home, I'd have fired up the MacBook straight away to start with the process of stacking. A room full of family told me that was a bad idea so the PP waited till morning.

For a single frame of pinprick stars an optimised image requires more extensive PP. But with startrails filling the sky so comprehensively, the effort invested in setting up the camera on-location means a light-handed approach to PP is fine. Camera JPGs were stacked in StarStaX before being imported to PS for minor tweaks to WB, contrast and saturation.

I guess the changes are tiny, and you'd barely notice them.

Thursday, September 15, 2011

How to... light-painted domes


Scientists, IT consultants, mathematicians, doctors, my gran and a geologist. Nope, not the invite list for Party of The Year- it's a cross section of the hundreds, maybe even thousands of people around the world who've been amazed, intrigued and puzzled by The Dome since it first hit flickr in May 2010. And they're going to be even more, erm, cross when they find out just how straightforward the technique is. Well, not my gran if I'm honest - she's all over it. But all the others are true.

Let me say this. I've enjoyed the buzz - who wouldn't? The emails I get every day bear witness to the interest it's created. I think my favourite thing is seeing comments from light painters who've been inspired to reverse engineer the tool and are rightfully proud of achieving that.

But alas, just as numerous dome artists are now springing up around the globe, sooner or later someone's gonna want to get their name in lights with a tutorial about how it's done - so I'm getting in first.

Before I spill the beans though, I need to get out what a relief it is for it not to be under wraps any more. In trying to keep people guessing, I ended up stifling my own creativity for fear of giving out too many clues. For instance - you've never seen me produce a multicolour dome, or a dome with deliberate large gaps. In my mind, both of those would have opened the tool up to close scrutiny so remained on my to-do list for when the shape became as commonplace as the orb. In reality, both have now been done by others (and done well, for the record) and still light junkies en masse are none the wiser.

There's a lesson in there - be motivated for the right reasons.

So, without further delay, let me introduce you to The Dome and tell you not only how to make your own but how to wield it like a pro.

All you need

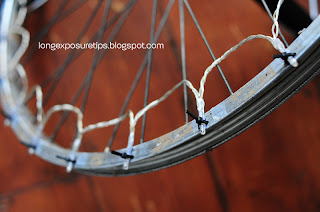
  • 1 bike wheel. Any regular circle will do but bike wheels are essentially hollow and that see-throughness helps with the 3D illusion 
  • 1 set of 20 or so festive lights from your seasonal surplus superstore
  • An axle, cut to the length of the wheel's radius 

What you do
1) Evenly space the lights around the rim of the wheel.
  • The further out you go, the more the bottom of your dome shape will appear as a point, not a curve. 
  • In the early sessions I spent forever doing running repairs as LEDs would get knocked out of position or whatever - this idea for fixing using tiny zip ties comes from flickr's own LED Eddie who, coincidentally, was the first to demonstrate he'd work out the dome technique. 
2) Fix the axle firmly to the wheel's hub.
  • When the tool is in its primed position, the highest point of the wheel rim should be directly above the pivot point. 
3) Switch the lights on and roll the wheel around smoothly and at a steady pace.
  • In this shot I've set up the tool ready to go and lit it so it's visible in the shot. Then I created a dome that looks overlaid on top of the tool. 
  • I fitted cable extensions and push-to-make switches to my lights so I can get them on and off without hassle. 
  • Always start with the lights facing you - any stutters/ overlap or underlap will appear at the rear of the shape away from the camera. 
4) Amaze your friends

So there it is. Go forth lightly.


Edit -


One thing I meant to reference in the original post is how because of the whole rolling round thing, domes always appear on a surface... which is why I was particularly proud of this- the first (and so far only) levitating dome


Click for "Another Level" on flickr