Tuesday, November 8, 2011

Story of... Out After Midnight

Posted as an insight to this image on flickr of a long exposure star trail over a small island.

The changes were tiny at first, and I barely noticed them.

But soon the patches of darkness caused by increasing distances between streetlights meant there were places for people to hide. I stopped beneath a lamp to question whether I was doing the right thing, out after midnight in a town I don't know in a country whose language I don't speak.

On the one hand I was tired, having walked many km over the last 24 hrs looking for potential locations; my legs were starting to whisper that they didn't have much left in them.

On the other hand, I hadn't seen a soul since I left the hotel so what were the chances of needing to flee from an aggressive stranger?

Turning Point: where the houses started to change (© Google)
I looked to where I'd come from. And turned back to face where I'd been heading. Behind me, small houses, low apartment blocks, taller towers of flats and the distant glow of the city. Ahead of me small houses, bigger houses, bigger houses with more land. The cars got newer and shinier.

It wasn't until I saw a small dinghy in someone's front garden that I knew my hunch was going to pay off. Looking out over water from this near-island city would mean looking towards nothing but clear dark skies. Shuffling my camera over my shoulder felt reassuring, serving as a reminder how I'd found myself in this moment.

I walked on.

Just a few hundred metres further I found the lake and spent a few minutes watching the settled mist on the water. One of the most common disruptions to night photography is a lens that won't stop misting over. Would it happen to me? Hopefully the time spent with gear over my shoulder had allowed it to adjust to the ambient temperature.

Nearly... couldn't make a landscape version work
To the right of the island, Orion had just risen above the waterlogged horizon. With its 7 bright stars, Orion would have left a landscape frame too imbalanced so I set up vertically, taking extra time in the extreme darkness to align the horizon precisely.

When I'm out on location, one of the ways I double-check my alignments is to fire off a test shot then zoom in to a horizontal or vertical line within the frame to see if it runs parallel to the margins of the camera's preview screen. Unable to make out any usable reference points, it took several attempts on this occasion.

Having gone to the expense of hiring a fast, wide lens, I wanted to shoot at f/1.4 so that was the first setting to get dialled in. My ISO started at 200 which is the native setting on the D300- the point at which its most comfortable; the point with the most dynamic range.

Next up, 30sec on the exposure duration. It's the longest most cameras will expose for without manual intervention which makes it ideal for star trails where you want to fire off dozens of frames continuously with the cable release locked down.

I shot a frame at those settings and reviewed: the stars were coming through just fine but the scene was darker than I liked. I added light with exposure adjustments and a minor ISO shift then set the shutter running.

Couple of little tips for you: an intervalometer would have made things so much easier than standing next to the camera throughout the exposure, clicking the shutter cable closed then open again at a precise frequency. Without the intervalometer I ran the risk of missing an interval, or knocking the tripod, or some other element of human error. As it was, the timer on my phone alerted me to each passing minute and, fortunately, things turned out good.

Secondly, standing in the dark my camera becomes the brightest object around when I preview my shots. The LCD brightness is turned down to compensate but I always add up to 2/3rds stop of light to what looks like the right settings, just to be sure.

Starting to feel the cold of the Finnish autumn and aching from shutter RSI, it was time to pack up, but not yet time to let my guard down. With the reverse walk ahead of me I pocketed the memory card, a habit to safeguard my work, and headed back to the hotel.

Route: Thankfully I travelled light for the walk (© Google)


At home, I'd have fired up the MacBook straight away to start with the process of stacking. A room full of family told me that was a bad idea so the PP waited till morning.

For a single frame of pinprick stars an optimised image requires more extensive PP. But with startrails filling the sky so comprehensively, the effort invested in setting up the camera on-location means a light-handed approach to PP is fine. Camera JPGs were stacked in StarStaX before being imported to PS for minor tweaks to WB, contrast and saturation.

I guess the changes are tiny, and you'd barely notice them.

Thursday, September 15, 2011

How to... light-painted domes


Scientists, IT consultants, mathematicians, doctors, my gran and a geologist. Nope, not the invite list for Party of The Year- it's a cross section of the hundreds, maybe even thousands of people around the world who've been amazed, intrigued and puzzled by The Dome since it first hit flickr in May 2010. And they're going to be even more, erm, cross when they find out just how straightforward the technique is. Well, not my gran if I'm honest - she's all over it. But all the others are true.

Let me say this. I've enjoyed the buzz - who wouldn't? The emails I get every day bear witness to the interest it's created. I think my favourite thing is seeing comments from light painters who've been inspired to reverse engineer the tool and are rightfully proud of achieving that.

But alas, just as numerous dome artists are now springing up around the globe, sooner or later someone's gonna want to get their name in lights with a tutorial about how it's done - so I'm getting in first.

Before I spill the beans though, I need to get out what a relief it is for it not to be under wraps any more. In trying to keep people guessing, I ended up stifling my own creativity for fear of giving out too many clues. For instance - you've never seen me produce a multicolour dome, or a dome with deliberate large gaps. In my mind, both of those would have opened the tool up to close scrutiny so remained on my to-do list for when the shape became as commonplace as the orb. In reality, both have now been done by others (and done well, for the record) and still light junkies en masse are none the wiser.

There's a lesson in there - be motivated for the right reasons.

So, without further delay, let me introduce you to The Dome and tell you not only how to make your own but how to wield it like a pro.

All you need

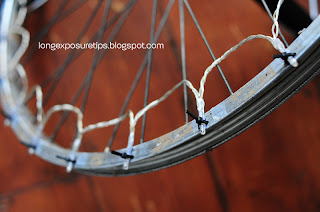
  • 1 bike wheel. Any regular circle will do but bike wheels are essentially hollow and that see-throughness helps with the 3D illusion 
  • 1 set of 20 or so festive lights from your seasonal surplus superstore
  • An axle, cut to the length of the wheel's radius 

What you do
1) Evenly space the lights around the rim of the wheel.
  • The further out you go, the more the bottom of your dome shape will appear as a point, not a curve. 
  • In the early sessions I spent forever doing running repairs as LEDs would get knocked out of position or whatever - this idea for fixing using tiny zip ties comes from flickr's own LED Eddie who, coincidentally, was the first to demonstrate he'd work out the dome technique. 
2) Fix the axle firmly to the wheel's hub.
  • When the tool is in its primed position, the highest point of the wheel rim should be directly above the pivot point. 
3) Switch the lights on and roll the wheel around smoothly and at a steady pace.
  • In this shot I've set up the tool ready to go and lit it so it's visible in the shot. Then I created a dome that looks overlaid on top of the tool. 
  • I fitted cable extensions and push-to-make switches to my lights so I can get them on and off without hassle. 
  • Always start with the lights facing you - any stutters/ overlap or underlap will appear at the rear of the shape away from the camera. 
4) Amaze your friends

So there it is. Go forth lightly.


Edit -


One thing I meant to reference in the original post is how because of the whole rolling round thing, domes always appear on a surface... which is why I was particularly proud of this- the first (and so far only) levitating dome


Click for "Another Level" on flickr

Friday, July 8, 2011

Heading Back (to basics)

PhotoShop, stacking, custom WB, speedlights, electronic light trickery.

Forget all that, sometimes it's good to go back to being just you and the camera.


Shot this last night and posted straight from the camera. Here's what I did and why:

Taken at twilight to get some colour in the sky- best time of day for balancing light levels in the sky and ground.

Auto white balance to make sense of the different colour temps across the scene, from the moody blue sky through LED dash, tungsten interior light and HID headlamps.

Composition was pretty limited. The Fat Gecko mount hasn't let me down yet for grip but that doesn't mean I'm up for big risks. So, the camera had to go where I could within reach of looping its strap through the roll-hoop behind the driver's seat.

Hit the dual carriageway and kept my speed to about 50mph for the best compromise between camera stability and being rear-ended by a speeding truck.

Waited until a car passed me before opening the shutter. This brought the picture to life with motion from light trails.

Positioned the door mirror so my face would be visible in the reflection. And flicked on the interior light to lift the darkness inside the car. There's two lights in the cabin of a TT roadster. The first one was in frame so I went for the other side.

Only thing that didn't work out as planned was just how much bounce my Fat Gecko mount was giving.

Updated tutorial on driving shots coming soon.

Tuesday, June 21, 2011

How to... top tips for urban star trail success

For years I'd heard people say urban star trails couldn't be done: the ambient light's too great; you need to get far away from any light pollution; everything turns orange. Stand in the middle of a city on a clear night and you'd be forgiven for believing it. From down amongst the garish glow of streetlamps and neon signs promoting food you'd never eat when sober it's near-impossible for our eyes to pick out pinpricks of starlight high above.

For our cameras, though, it's a different story altogether. f/2.8 is f/2.8, wherever you happen to be pointing your lens- as far as environmental awareness is concerned, the camera is pretty dumb. So I figured it was worth searching out a composition to disprove the theory and see what happens when you shoot urban long exposures at wide apertures.

There's one thing in particular that continues to fascinate me about capturing urban star trails and that's how the result can appear to flip reality. You might expect to see a human element in some frames but at ground level there's just stillness. Instead, what you don't expect is how the sky's brought to life by the earth's perpetual motion.

So that's my take. Whatever your motivation, the complexity of shooting urban star trails means the results can be very rewarding. Before you get out there and try it for yourself here's a handful of tips to point you in the right direction.


Ditch the wide angle and look up.
You need to get above the level of the streetlamps. Most of the time that's not physically possible so let a longer lens do the job for you - my 35mm and 50mm primes have seen lots of use for this reason. Avoid areas in direct street lighting, which usually means compose your camera upwards, but try to find an angle that captures an ambient glow to shed a little light on your foreground.

Shoot wide open.
Stars don't disappear from view just 'cos you're at an urban vantage point, they simply become harder to see with the naked eye due to the contrast between dark sky and ambient streetlighting. If you can find a composition that lets you shoot long exposures at f/2.8, the stars will be there. Use exposure duration to control the ambient light - how bright the scene looks is down to personal preference but I tend to use 15-30 second exposures and run consecutive frames for 20-60 minutes.

Learn your hyperfocal distances.
You might think shooting a scene at f/2.8 would give you depth of field headaches but there's a factor of DoF that often gets forgotten. Sure, it's about focal length and aperture but the final piece of the triangle is focal distance - how far away you are from your subject. Hyperfocal distance gives you the data you need to find a winning composition with your lens wide open. Get the data you need at DoFmaster


Get orientated.
If you want circular trails, find Polaris (the pole star) by running an imaginary line from the end of the scoop of The Plough constellation. A good starting point is to face north and look up. For straighter trails, shoot south or a few degrees either side. In the same way the rim of a bike wheel covers more distance than the hub in the same time, pointing your camera at Polaris means a long wait for extended star trails, whilst shooting away from the pole star makes your trails seem to grow at a quicker pace.

Set up the camera right
If you're shooting RAW you can skim this bit as you'll make your adjustments in PP. I tend to shoot JPG - stacking using StarStaX freeware is so much quicker than using PhotoShop so it matters how the camera's set up.


> White balance: neutralise the orange colour cast from streetlamps by manually setting your WB all the way down to 2500K. This adds blue back into the image.

> Contrast: max it right up to cut through the city haze that often appears around well lit areas.

> Brightness: your pic's going to be pretty bright anyway, you can probably keep this at zero.

> Saturation: adding saturation also adds contrast so a little can be a good thing. If you can't shift the urban colour cast with manual WB, though, the option's there to turn down the saturation- or you could convert to mono in post. Shooting star trails using mono in-camera is an unreliable method as often the toning can eliminate subtle star trails that would be captured in colour and could be retained by subsequent careful conversion to mono.

Know when to give up
Not every excursion ends with a successful image. If your efforts are coming to nothing because of location, weather, streetlighting or some idiot trying to jump in front of your camera (I've packed up on occasions because of each of these), it might just be a sign to take an early bath.


There's always the chance you'll reflect on what you did manage to capture and appreciate it for other reasons. The shot above got clouded out after just a few minutes but I've reached the conclusion that trails any longer would have over-complicated the image.

If reading this has left you inspired to get out and try it for yourself I'd love to see what you come up with. Feel free to outlink to your work in the comments below.

Thursday, May 19, 2011

How to... lightpainting cars

With a portfolio of car images shot pretty-much entirely at nighttime I get emails and forum PMs pretty much daily looking for tips and techniques about lightpainting cars. It's reached the point where I can't answer each one individually but here's a summary of some of the most common answers I've given, all wrapped up into one neat post with pics.

First off, a bit of background. It's taken me years to get into PP so one of the reasons I started lightpainting is because you *can* get great results in a single frame straight out the camera. Doesn't have to be like that if PP floats your boat, just saying. Budget needn't be an issue either, with many of my photos being lit with ghetto solutions. Worried about light spill? cereal box and black duct tape around your £4 LED camping lantern. Can't reach high enough? more duct tape, this time holding your light to a broom handle. Whatever it takes.

The other thing is that for me, LP is all about the reflected highlights - those white lines you get defining the car's form and making it look very studio-lit and contrasty. But there are some occasions where that effect won't work or can't work so at these times you need to do something different.

Right, so let's look at some pics, starting with some older ones using primitive light tools. I've picked photos to demonstrate certain tools/ techniques rather than because they're necessarily great images. On that basis not really looking for C&C on the pics but will try and answer if there's any questions.

Scirocco - single 5min exposure at f/4.


This was lit with a round LED parasol lamp. You've prob seen them for a few quid in ASDA or wherever, about 8" round and a hole in the middle for the parasol to stick through. You can see a bit of light leakage in places but mostly the light was concealed by a small cardboard box to prevent the light itself appearing in shot. Worth noting the overexposed areas on the bonnet don't precisely coincide with the highlights - this is your first clue when it comes to understanding where light falls and how to get your highlights where you want them.
-----

A5 - single exposure (I forget the exif)


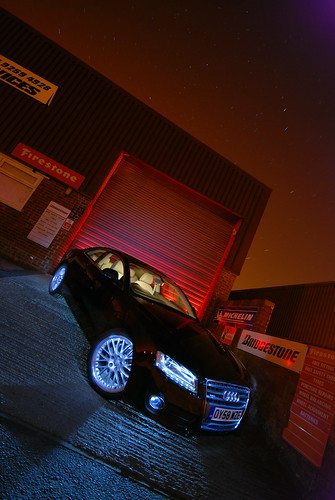
Wheels and grille were picked out with a small torch. Garage door was lit with flash and a red gel. I used several bursts of flash at low power to try and light the car- notice, it did nothing, there's no detail at all in the side panels. Meanwhile...
-----

A5 - single exposure


...more details in the side of the car here though still not perfect, and a narrow rather than broad pinstripe - this was lit with a large 3w LED Maglite with the reflector taken off. Just walked from one side to the other, between the car and camera. To some extent the higher you hold your light, the higher up the car the reflection appears (see the Seat pic further down).
-----

Nissan Note - composited (in camera, using Nikon [I]Image Overlay[/I] function, see flickr page for specifics)


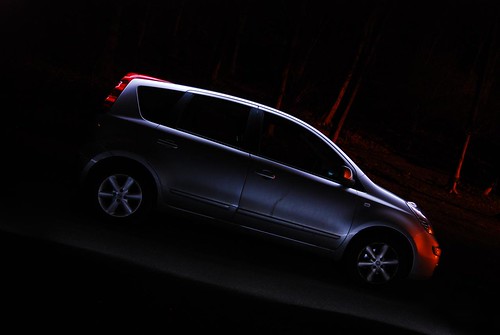
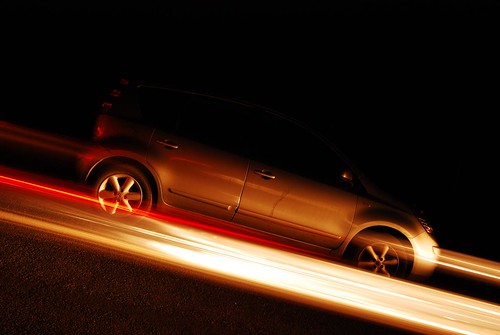
Key here is seeing how the light affected each frame and adding more to suit. The light was a 12v cold cathode which didn't provide a lot of light so I had to get really close to the car, hence the spread isn't that great in each frame. Again I shrouded the light to prevent it being seen in the frame. Background wasn't up to much so I passed behind the car flashing the cathode on and off to give that block finish, and timed the last frame for a passing car.
-----

Lamborghini Diablo - single exposure 4mins f/9


Generally speaking, the darker the colour the better it reflects the highlights of your light source. So, with this bright colour I didn't even bother trying a light drawn around the car. Instead I used a powerful LED torch with its reflector still in place. The technique is pretty much the same as with speedlights: position yourself at several places around the car during the extended exposure. Using a torch (instead of flashes) means you can see exactly where your light is reaching and adjust position accordingly. I remember mostly lighting forwards from the rear of the car so I could keep the black areas of ducts nice and dark. Aside from the watermark this is unedited - hence tripod shadow still in frame haha
-----

Lamborghini Gallardo - 20 sec f/10


The relatively high f/stop was because I wanted to limit spill so only the highlights shone through, defining just the edge of the car. Again it meant the light had to be really close to the car. The light was simply (but carefully) moved from one end of the car to the other. Notice where the light does spill onto the ground there's just a short area of shadow before the car, telling you the light was slightly behind where its reflection appears. This was with a 12v flouro, about a foot long- quite a friendly light source in that it's portable and fairly bright and also gives a nice narrow highlight instead of the broad lines that can be left by softboxes.
-----

Seat Leon


This was a softbox image - massive torch inside one of those portable fold-up thingies. The light spreads really nicely and you can control how much you light your subject by walking faster or slower (or by how close/ far away you are). In this shot I walked along the top of each of the embankments you see. The distance meant more of the scene got lit but the height ended up leaving highlights on the side windows which I normally try and avoid. The highlight on the windscreen is much broader than on the panels but I've now worked out by feathering the light (that is, angling the softbox up or down) you can reduce the width of the reflection.

The other thing to say is about angle of incidence/ reflection. When you're shooting straight on to your car (front/ rear/ side) you can pass through from one side of the frame to the other, starting and finishing a couple of foot either side of the car. You'll get a highlight right the way across your subject. As soon as you move away from straight on, you need to start walking way, way past your subject if you want the highlight to continue right to the end of the panel(s). Light on the road in the Seat pic above shows I walked prob a full car length past the rear of the Leon and the highlight just reaches the back of the rear wing.

And now a final word on shadows: moving along the car with a light tends to eliminate what we think of as natural shadows and can leave the car looking very pasted in. If you're into PP the best way around this is with a frame for the ground level that retains a shadow from somewhere - you can create this with your own light or use the shadow from a nearby streetlamp or whatever.


If you like to leave your images untouched then the only way I've really come up with is to light underneath the car from behind which, although not always as convincing, has the benefit of adding fantastic texture to the surface. Bear in mind though, unless you're shooting on pale concrete it takes a lot of light to brighten up a dark road surface!

Well, that's all I can think of unprompted and I hope it's useful. If you've read it through and still have questions, fire away in the comments and I'll try and answer publicly for the benefit of future readers.

Tuesday, April 26, 2011

Story of... "Time"


Shooting solo so often, I tend to do a bit of research before embarking on any expeditions outside my home town. With flickr and google maps you can get a pretty good feel for things like parking, access and vantage points. Having scouted this location virtually I made the journey for real for the first time back in February, only to encounter hostile conditions on arrival. Six weeks later I struck lucky on the second attempt.

Each attempt involved a 160 mile round trip taking 4 hours in the car. It's a fair old trek down to the beach from the road (and moreso back up again!) and so eerie were the grazing sheep I could hear but not see I decided to count my footsteps to distract my mind. About 2200 each way, with nearly 2000 more paced up and down the beach whilst the exposure was burning. It was cold down there so keeping moving was a priority, especially as the need to carry tripod and peli case on the walk down meant my fingers were already pretty chilled through. And, in the excitement of the moment (c'mon, simple things keep me happy) I'd not considered the effect on the beach of the outgoing tide so knelt down to assess the perspective through the arch thus soaking my jeans from the damp sand

Before I set out to create this image I'd looked around to see if it had been done before. It hasn't that I can see, and I'm pretty sure the challenges of the location play a part in why not, despite the high rewards. On the journey down I had it in mind to stack, a layering technique that allows you to capture star trails even in areas with ambient light. As it happens, these were pretty much the darkest conditions I've ever encountered whilst shooting outside and my test shots at ISO1600 then ISO3200 served no purpose other than to confirm the darkness. It was even too dark to assess the composition through the viewfinder so this framing was achieved by numerous test shots at ISO6400 to manipulate the horizon and positioning of the arch.

As it turns out, stacking wasn't necessary. I knew from the equivalent metering of my high-ISO tests that at ISO200 the exposure duration would be sufficient to achieve a visually strong arc of stars through the sky. 1568 seconds when the shutter closed; or just over 26 minutes. When I got back to the car it was nearly 2am. The thermometer on the dash was reading -1.5Âșc. At this point I should probably mention my fractured coccyx, picked up from an uncomfortable landing a couple of weeks previously and doing all kinds of wrong to my pain receptors as I sat in the driver's seat. I necked a couple of painkillers, turned the ignition and let the euphoria of seeing my camera's preview screen glide me home.

Thursday, March 17, 2011

How to... urban traffic trails

Trails of traffic can make for a great effect on long exposure. Out on a meandering country road or from a bridge above a slowly-vanishing motorway there's usually enough traffic or enough time to ensure you get the shot you're after with the right balance of depth and tones, particularly if you're looking for a hint of twilight blue in the sky. But what about traffic trails in an urban environment where intense street lighting adds an extra complication and as a result, twilight's harder to judge?

Well, I've been thinking on this for a while and with a new junction just having opened in town I went out this morning to put my theory to the test. First off, here's one of the resultant images:


The difficulty with urban traffic trails is trying to balance the exposure. To capture the vehicle lights you're looking at shooting around the ISO200 f/16 mark, but with street lights doing their job of making everything bright those settings can limit you to an exposure duration of maybe 10 seconds.

Once you add some ambient glow from twilight your exposure duration is reduced again down to maybe as little as a couple of seconds - and that's not long enough for your original plan of traffic trails. What to do?


These two images are single frames from the final stacked image up top. You can see there's no way I could have captured all the trails in a single frame without compromising the look of the image - the trails would have faded against a bright roadway or the sky would have blown out- or both.


The more I thought about it (which, if I'm honest, wasn't actually that long) the more this conundrum seemed akin to stacking star trails. So, having arrived on location I composed my shot and set the aperture to f/16 to capture the vehicle lights without blowing the highlights. An aesthetic possibility of shooting at narrow apertures is that any static lights in the frame take on the appearance of starbursts, according to the format of the lens' aperture blades - check out the rays of light coming off the traffic lights and streetlamps. f/16 and ISO200 gave me a base exposure of 2.5secs so I fired off several frames consecutively, making sure that for each lane of traffic I had traffic coverage where I wanted it. An advantage of this technique is to not worry too much about planning ahead for the right traffic density - if you see a truck or bus coming and want its high trails, keep the shutter on continuous whilst it passes through the frame; if there's periods with no traffic, you don't have to expose. Just go with what's there.

To layer up my images I used the startrails.exe (PC only) freeware application from http://www.startrails.de/ It's pretty easy to use but the help files are all in German so I'll cover the instructions in a future post. Mac users, I've yet to find freeware that does the same thing but it's pretty much the same as layer mode > lighten in PS.

I'll also be posting about my urban star trails series so check back soon for more LE tips.