Photography is all about light. Right here you'll find some of the tips and tricks I've learned for shooting when there isn't any.
Tuesday, April 26, 2011
Story of... "Time"
Shooting solo so often, I tend to do a bit of research before embarking on any expeditions outside my home town. With flickr and google maps you can get a pretty good feel for things like parking, access and vantage points. Having scouted this location virtually I made the journey for real for the first time back in February, only to encounter hostile conditions on arrival. Six weeks later I struck lucky on the second attempt.
Each attempt involved a 160 mile round trip taking 4 hours in the car. It's a fair old trek down to the beach from the road (and moreso back up again!) and so eerie were the grazing sheep I could hear but not see I decided to count my footsteps to distract my mind. About 2200 each way, with nearly 2000 more paced up and down the beach whilst the exposure was burning. It was cold down there so keeping moving was a priority, especially as the need to carry tripod and peli case on the walk down meant my fingers were already pretty chilled through. And, in the excitement of the moment (c'mon, simple things keep me happy) I'd not considered the effect on the beach of the outgoing tide so knelt down to assess the perspective through the arch thus soaking my jeans from the damp sand
Before I set out to create this image I'd looked around to see if it had been done before. It hasn't that I can see, and I'm pretty sure the challenges of the location play a part in why not, despite the high rewards. On the journey down I had it in mind to stack, a layering technique that allows you to capture star trails even in areas with ambient light. As it happens, these were pretty much the darkest conditions I've ever encountered whilst shooting outside and my test shots at ISO1600 then ISO3200 served no purpose other than to confirm the darkness. It was even too dark to assess the composition through the viewfinder so this framing was achieved by numerous test shots at ISO6400 to manipulate the horizon and positioning of the arch.
As it turns out, stacking wasn't necessary. I knew from the equivalent metering of my high-ISO tests that at ISO200 the exposure duration would be sufficient to achieve a visually strong arc of stars through the sky. 1568 seconds when the shutter closed; or just over 26 minutes. When I got back to the car it was nearly 2am. The thermometer on the dash was reading -1.5Âșc. At this point I should probably mention my fractured coccyx, picked up from an uncomfortable landing a couple of weeks previously and doing all kinds of wrong to my pain receptors as I sat in the driver's seat. I necked a couple of painkillers, turned the ignition and let the euphoria of seeing my camera's preview screen glide me home.
Thursday, March 17, 2011
How to... urban traffic trails
Trails of traffic can make for a great effect on long exposure. Out on a meandering country road or from a bridge above a slowly-vanishing motorway there's usually enough traffic or enough time to ensure you get the shot you're after with the right balance of depth and tones, particularly if you're looking for a hint of twilight blue in the sky. But what about traffic trails in an urban environment where intense street lighting adds an extra complication and as a result, twilight's harder to judge?
Well, I've been thinking on this for a while and with a new junction just having opened in town I went out this morning to put my theory to the test. First off, here's one of the resultant images:
The difficulty with urban traffic trails is trying to balance the exposure. To capture the vehicle lights you're looking at shooting around the ISO200 f/16 mark, but with street lights doing their job of making everything bright those settings can limit you to an exposure duration of maybe 10 seconds.
Once you add some ambient glow from twilight your exposure duration is reduced again down to maybe as little as a couple of seconds - and that's not long enough for your original plan of traffic trails. What to do?
These two images are single frames from the final stacked image up top. You can see there's no way I could have captured all the trails in a single frame without compromising the look of the image - the trails would have faded against a bright roadway or the sky would have blown out- or both.
The more I thought about it (which, if I'm honest, wasn't actually that long) the more this conundrum seemed akin to stacking star trails. So, having arrived on location I composed my shot and set the aperture to f/16 to capture the vehicle lights without blowing the highlights. An aesthetic possibility of shooting at narrow apertures is that any static lights in the frame take on the appearance of starbursts, according to the format of the lens' aperture blades - check out the rays of light coming off the traffic lights and streetlamps. f/16 and ISO200 gave me a base exposure of 2.5secs so I fired off several frames consecutively, making sure that for each lane of traffic I had traffic coverage where I wanted it. An advantage of this technique is to not worry too much about planning ahead for the right traffic density - if you see a truck or bus coming and want its high trails, keep the shutter on continuous whilst it passes through the frame; if there's periods with no traffic, you don't have to expose. Just go with what's there.
To layer up my images I used the startrails.exe (PC only) freeware application from http://www.startrails.de/ It's pretty easy to use but the help files are all in German so I'll cover the instructions in a future post. Mac users, I've yet to find freeware that does the same thing but it's pretty much the same as layer mode > lighten in PS.
I'll also be posting about my urban star trails series so check back soon for more LE tips.
Well, I've been thinking on this for a while and with a new junction just having opened in town I went out this morning to put my theory to the test. First off, here's one of the resultant images:
The difficulty with urban traffic trails is trying to balance the exposure. To capture the vehicle lights you're looking at shooting around the ISO200 f/16 mark, but with street lights doing their job of making everything bright those settings can limit you to an exposure duration of maybe 10 seconds.
Once you add some ambient glow from twilight your exposure duration is reduced again down to maybe as little as a couple of seconds - and that's not long enough for your original plan of traffic trails. What to do?
These two images are single frames from the final stacked image up top. You can see there's no way I could have captured all the trails in a single frame without compromising the look of the image - the trails would have faded against a bright roadway or the sky would have blown out- or both.
The more I thought about it (which, if I'm honest, wasn't actually that long) the more this conundrum seemed akin to stacking star trails. So, having arrived on location I composed my shot and set the aperture to f/16 to capture the vehicle lights without blowing the highlights. An aesthetic possibility of shooting at narrow apertures is that any static lights in the frame take on the appearance of starbursts, according to the format of the lens' aperture blades - check out the rays of light coming off the traffic lights and streetlamps. f/16 and ISO200 gave me a base exposure of 2.5secs so I fired off several frames consecutively, making sure that for each lane of traffic I had traffic coverage where I wanted it. An advantage of this technique is to not worry too much about planning ahead for the right traffic density - if you see a truck or bus coming and want its high trails, keep the shutter on continuous whilst it passes through the frame; if there's periods with no traffic, you don't have to expose. Just go with what's there.
To layer up my images I used the startrails.exe (PC only) freeware application from http://www.startrails.de/ It's pretty easy to use but the help files are all in German so I'll cover the instructions in a future post. Mac users, I've yet to find freeware that does the same thing but it's pretty much the same as layer mode > lighten in PS.
I'll also be posting about my urban star trails series so check back soon for more LE tips.
Tuesday, November 9, 2010
Story of... Bam!
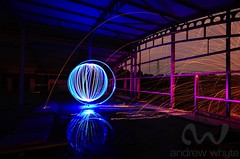
The sparks came first.
Of the three lighting elements within the shot, there's most potential for the wire wool to go wrong and render your whole exposure unusable. You never quite know how it'll disintegrate and no matter how well you thread it there's always the chance it will detach from your cable and soar, whole, straight through your composition; worse still it might soar away from your shot and remove any opportunity for an amazing freak capture. That's why, for me, igniting the wool is always top of the list.
Next up was the light to the building's frame. Pink, to contrast with the blue of the orb to follow. It was colouring the framework that took the time: after spending an age on pre-visualisation and planning, the shutter clicked open moments after the pubs kicked out, every passing pair of headlights necessitating a pause in my proceedings. I walked forwards from just right of the camera away into the corner of the structure. Every four steps brought a new burst of flash, firing backwards at framework I'd already passed to avoid silhouetting myself.
Last up, the orb. Measuring a mere 9ft across it cast its blue light further still, lending the corrugated ceiling an indigo glow and presenting a neat reflection in the oily puddle that I'd trodden carefully around so often on my walkthroughs.
Single, eight-minute exposure. JPG from the cam + watermark
Subscribe to:
Posts (Atom)